
Tamiya Extra Thin vs Quick-Setting vs Mr. Cement S & Sprue Goo

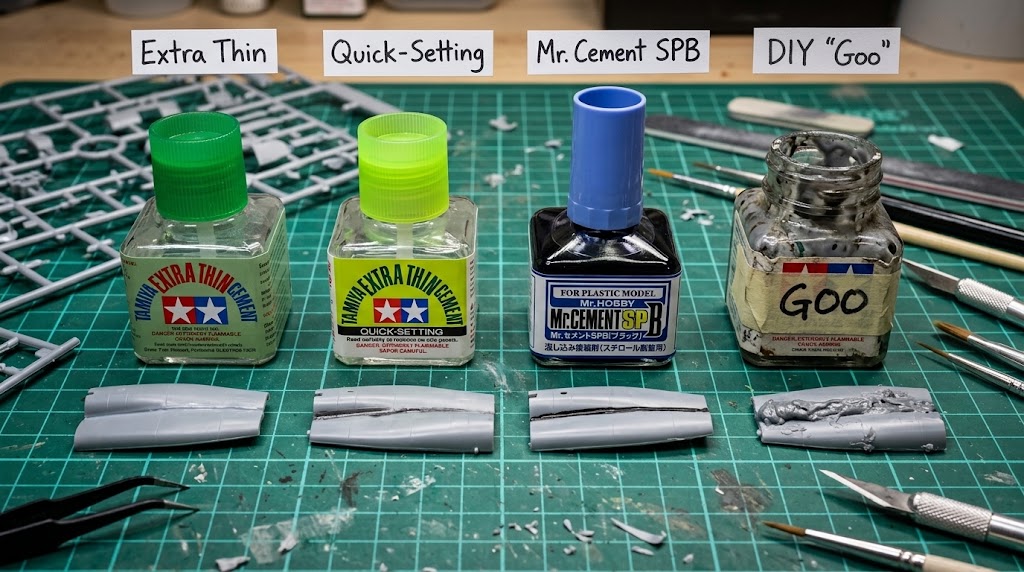
Tamiya Extra Thin vs. Quick-Setting vs. Mr. Cement S & Sprue Goo: Which Plastic Cement Actually Hides Seam Lines? (2026 Bench Guide)
Walk over to any serious scale modeler’s desk and you are guaranteed to spot at least two square glass bottles with green caps sitting next to the cutting mat. One has a dark green cap (Tamiya Extra Thin #87038), and the other has a lime-green cap (Tamiya Extra Thin Quick-Setting #87182). Right next to them, you’ll probably see a bottle of GSI Creos Mr. Cement SP (Black) and an old, crusty Tamiya jar with a piece of masking tape wrapped around it that says “GOO.”
If you are coming from our general beginner overview on What’s the Best Glue for Plastic Models?, you already know that liquid plastic cements aren’t actually glues at all—they are chemical welding solvents that melt polystyrene so the two halves fuse into a single piece of plastic. But when you put a Tamiya Extra Thin vs Quick-Setting vs Mr. Cement S showdown to the test on a real build—like joining the long fuselage halves of the ICM 1/48 MiG-25PD Foxbat & Kotare 1/32 Hurricane Wave or assembling workable tracks on our Tamiya 1/48 F-14B Tomcat (#61129) & Border 1/35 Leopard 2A8 kits—each bottle has a very specific job. Use the wrong one in the wrong spot, and you end up sanding “phantom sink marks” for three days.
Disclosure: Hobbyzero is reader-supported. If you pick up supplies through our links, we may earn a small coffee-fund commission at no extra cost to you.
⚡ The Real-World Bench Summary (No Marketing Fluff)
- Dark Green Cap (#87038) Is for Ooze Welding: Standard Tamiya Extra Thin uses a 50/50 blend of butyl acetate and acetone. It evaporates slowly (~40 seconds), giving it time to deeply melt the plastic so a tiny ridge of molten styrene squeezes out when you pinch two fuselage halves together.
- Lime-Green Cap (#87182) Is for Clean Capillary Welds: Tamiya Quick-Setting adds fast-flashing methyl ethyl ketone (MEK) / ethyl acetate. It wicks twice as fast, dries in 10 seconds, and won’t leave ugly melted thumbprints if a drop accidentally runs onto the wing surface.
- Why Mr. Cement SPB Is Dyed Pitch Black: Trying to see if a seam line is actually filled on grey plastic is a nightmare for your eyes. Mr. Cement SPB (Black) leaves a built-in black tracer line inside the joint—once the black line sands away, you know the seam is 100% flush!
- Sprue Goo Beats Putty Every Time: Standard hobby putties shrink and crack as their solvent evaporates. Dropping chopped-up leftover sprue bits (clipped with your Tamiya 74123 nippers) into a half-empty bottle of Extra Thin makes liquid polystyrene that cures at the exact same hardness as your model—meaning you can scribe panel lines right through it without chipping!
Capillary Cements Compared: Evaporation Speed & Melt Depth
| Cement Bottle | Flash-Off Speed | Plastic Melt Depth | What We Actually Use It For on the Bench | Link |
|---|---|---|---|---|
| Tamiya Extra Thin (Dark Green #87038) | Medium (~40 sec) | Deep (4/5) | Squeezing out a melted bead on fuselage/gun barrel seams & making Sprue Goo | Amazon |
| Tamiya Quick-Setting (Lime Cap #87182) | Ultra-Fast (~10 sec) | Shallow-Clean (2.5/5) | Dry-fitted tight joints, tiny cockpit parts & zero-stain surface wicking | Amazon |
| Mr. Hobby Mr. Cement S (Blue Cap) | Fast (~15 sec) | Medium-Hot (3.5/5) | Slightly hotter bite than Tamiya Quick-Setting; great all-rounder | Amazon |
| Mr. Cement SPB (Super Power Black) | Fast (~15–20 sec) | Deep + Black Dye (4/5) | Built-in black seam-checker; shows exactly where you still need to sand | Amazon |
| Tamiya ABS Cement / Plastruct Bondene | Medium-Slow | Heavy (5/5 on ABS) | Welding ABS Gunpla inner frames, ship hulls & mixed-plastic joints | Amazon |
Dark Green vs. Lime Green: Why You Actually Need Both Tamiya Bottles
A lot of modelers assume Tamiya Extra Thin Quick-Setting (Lime Cap) is just a “newer, better” replacement for the classic Dark Green Cap. If you throw away your dark green bottle and only use Quick-Setting, though, you will quickly run into a problem when trying to erase seam lines on two-piece gun barrels, fuel tanks, or fuselage spines.
1. When the Dark Green Cap (#87038) Wins: The “Bead Squeeze” Method
To erase a seam line without using putty, you need enough melted plastic to physically ooze out of the crack like welding slag.
-
Because standard Dark Green Extra Thin evaporates much slower (~40 seconds), you can brush a generous coat along both halves of a 1/48 drop tank, wait 4 seconds for the solvent to soften the top layer of styrene into mush, and then squeeze the two halves tightly together.
-
A tiny, continuous ridge of melted plastic will squirt up out of the seam line. Let that bead harden overnight (don’t sand it after 20 minutes, or it will shrink as the trapped solvent gas escapes and leave a “phantom trench” two days later!). Once cured hard, shave the bead flush with a #11 blade and sand—zero putty required.
2. When the Lime-Green Cap (#87182) Wins: Tight Fits & Link-and-Length Tracks
If you try that same heavy-handed approach with dark green Extra Thin on a modern, laser-tight Tamiya or Kotare cockpit assembly, it melts too much plastic and stays wet too long.
-
Lime-Green Quick-Setting is much thinner and flashes off in about 10 seconds. You hold two dry-fitted parts together with your fingers, touch the fine brush tip to the hairline crack, and capillary action shoots the solvent 2 inches down the seam instantly.
-
Better yet, if a stray drop of Quick-Setting runs out onto the visible wing surface, just don’t touch it—it evaporates so fast that it barely marks the plastic!
-
Bonus Armor Trick: For 1/35 “link-and-length” or individual plastic tank tracks (like on our Leopard 2A8 vs Leopard 2A7V 1/35 Guide), glue a long straight run of 25 track links together on a ruler using standard Dark Green Extra Thin, wait 12 minutes until the glue is rubbery like al-dente pasta, and wrap the whole flexible strip right around the drive sprocket and roadwheels in one piece!
The 4 Bottles That Belong on Every Workbench (Honest Pros & Cons)
1. Tamiya Extra Thin Cement (Dark Green Cap #87038) — The Seam-Welding & Track-Bending Classic
There is a reason the classic 40ml square jar of Tamiya Extra Thin (#87038) is the single best-selling product in scale modeling history. Its 50/50 acetone and butyl acetate recipe hits the exact sweet spot between capillary flow and deep melting power, giving you enough open working time to nudge long fuselage halves into alignment before the weld locks up.
✅ Why We Use It:
- Melts styrene deeply enough to squeeze out a sandable weld bead on fuselage and fuel tank seams
- Gives you a 10–15 minute “semi-cured rubbery window” for wrapping 1/35 plastic tank tracks around sprockets
- The #1 base solvent for mixing homemade Sprue Goo once the bottle is half empty
⚠️ Watch Out For:
- Keep your fingers away from the joint while applying—if it wicks under your thumbprint, it will etch your fingerprint into the plastic!
- The cap brush stops reaching the bottom when the jar is 30% full (turn that leftover 30% into Sprue Goo!)
👉 Check price on Tamiya Extra Thin Cement (#87038) on Amazon
2. Tamiya Extra Thin Quick-Setting (Lime-Green Cap #87182) — Best for Fast, Stain-Free Assembly
When you are assembling tiny cockpit levers, photo-etch-sized plastic grab handles, or modern kits with zero-gap engineering, Tamiya Extra Thin Quick-Setting (#87182) speeds up your build time dramatically. You don’t have to sit there holding a landing gear strut for two minutes waiting for the plastic to firm up—touch the brush to the pin, count to five, and let go.
✅ Why We Use It:
- Flashes off 3x to 4x faster than standard Extra Thin with almost zero surface residue
- Lower viscosity shoots further along hairline cracks via capillary action
- Great for smoothing out micro-scratches after nub removal without turning the part mushy
⚠️ Watch Out For:
- Useless for brushing onto two parts separately before joining—it evaporates before you can bring the parts together! Always hold the parts together dry first, then wick it into the seam
👉 Check price on Tamiya Extra Thin Quick-Setting (#87182) on Amazon
3. GSI Creos Mr. Cement SPB (Super Power Black) — The Built-In Seam Line Inspector
Ever sanded a grey fuselage seam until it felt smooth to your finger, only to spray primer using our Airbrush Thinning Guide and realize the seam is still grinning right back at you? Mr. Cement SPB (Super Power Black) solves this by mixing black carbon pigment directly into a high-bite capillary cement. When it welds two grey plastic halves together, it leaves a razor-thin black line inside the joint. As you sand, any low spots or pinholes stay pitch black until the surface is truly 100% level.
✅ Why We Use It:
- Eliminates “check priming”—you can see with the naked eye if a seam line is completely sanded out
- Slightly hotter solvent bite than Tamiya Quick-Setting, giving you rock-solid structural welds on wing roots and Gunpla weapons
⚠️ Watch Out For:
- Never use Black SPB on unpainted white or light-colored Gunpla armor if you aren’t planning to paint over it—it will leave a dark hairline shadow!
- Shake the jar before opening so the black pigment at the bottom mixes up
👉 Check price on GSI Creos Mr. Cement SPB (Black) & Mr. Cement S on Amazon
4. Tamiya ABS Cement / Plastruct Bondene — For Mixed-Plastic Kits & Gunpla Inner Frames
Standard green-cap Tamiya Extra Thin is formulated strictly for Polystyrene (PS). If you try to use it on an **ABS plastic** Gunpla inner frame, a Trumpeter 1/350 ship hull, or certain Bronco/Dragon armor parts stamped `”ABS”` on the runner, the joint will snap right apart under finger pressure. Keeping one bottle of **Tamiya ABS Cement** (or **Plastruct Bondene / MEK**) on your shelf lets you chemically weld ABS-to-ABS and ABS-to-Styrene with full strength.
✅ Why We Use It:
- Actually melts and fuses tough ABS plastic where standard styrene cements fail
- Essential for repairing snapped Master Grade / Real Grade Gunpla skeleton joints
⚠️ Watch Out For:
- Thicker consistency than Extra Thin—apply neatly to mating pins rather than wicking from the outside
👉 Check price on Tamiya ABS Cement / Plastruct Bondene on Amazon
How to Mix “Sprue Goo” (And Why You still Get Ghost Seams)
Why do experienced builders hate traditional grey tube putties (like Tamiya Basic Putty or Squadron Green Putty) for fuselage seams? Two reasons:
-
Shrinkage: Tube putties are 50% solvent. Even if you sand them flat today, they keep shrinking for weeks—leaving a sunken groove right under your paint job.
-
Different Hardness & Scribing Flaking: Dried putty is chalky and softer than polystyrene. When you try to re-scribe a lost panel line across a puttied fuselage seam using a chisel from our How to Panel Line Without Cracking Plastic Guide, the putty crumbles and chunks out!
The 5-Minute DIY Sprue Goo Recipe:
-
Take a bottle of Dark Green Tamiya Extra Thin (#87038) that is down to its last 1/3 of liquid (right when the cap brush stops reaching the bottom!).
-
Grab an old leftover sprue runner—ideally dark grey or black styrene from an old Tamiya or Meng kit so it contrasts against light grey models—and chop about 3 inches of runner into tiny 2mm pellets.
-
Drop the plastic pellets into the bottle, screw the cap on tight, and walk away for 6 to 8 hours.
-
When you come back and give it a shake, the pellets will have dissolved into a thick, syrupy liquid polystyrene with the consistency of warm honey or pancake batter. (Too thick and stringy? Add a splash of fresh Extra Thin. Too runny? Drop in four more sprue pellets).
The Golden Rule of Using Sprue Goo: Wait 24 Hours!
Brush a thin bead of Sprue Goo along a wing-root gap or ejector pin mark with a toothpick. Because it is literal melted polystyrene dissolved in solvent, it fuses seamlessly into the surrounding kit plastic. Just don’t sand it after an hour! Give a thick bead of Sprue Goo a full 12 to 24 hours for all the trapped acetone/butyl acetate gas to escape. Once cured, it sands, polishes, and takes a panel-line scriber identically to the rest of the kit!
Frequently Asked Questions (FAQ)
Can you refill an empty Tamiya Extra Thin bottle with Tamiya Airbrush Cleaner (#87089)?
Yes—they are 99% the exact same chemical! If you check the Material Safety Data Sheets (MSDS) for both Tamiya Extra Thin Cement (#87038) and Tamiya Airbrush Cleaner (#87089), thedark-green-cap cement is 50% Butyl Acetate / 50% Acetone, while the giant 250ml bottle of Tamiya Airbrush Cleaner is 51% Butyl Acetate / 49% Acetone. Buying one 250ml jug of #87089 lets you refill your small 40ml brush bottle six times over for a fraction of the cost!
Why does Tamiya Extra Thin frost clear canopies (and what should I use instead)?
As we explained in our Enamel vs Lacquer vs Acrylic Model Paints chemistry breakdown, acetone and butyl acetate vapors aggressively attack bare polystyrene. If you glue a clear canopy down with Extra Thin (or standard superglue/CA), the trapped fumes condense on the inside of the clear glass and frost it permanently white. Always attach clear canopies using non-fuming PVA canopy glue (like Deluxe Materials Glue ‘n’ Glaze, Micro Kristal Klear, or Ammo Ultra Glue)—or wick a tiny drop of Tamiya Quick-Setting strictly along the outside frame after dipping the canopy in clear acrylic gloss!
How do I extend the short brush inside a Tamiya Extra Thin cap?
Look closely at the white plastic stem holding the brush inside your Tamiya Extra Thin cap—it is actually telescopic! Grab the plastic ferrule just above the bristles with a pair of tweezers or needle-nose pliers and pull downward firmly by about 5mm. The stem slides out so the brush reaches all the way to the bottom corners of the glass jar!
