Homemade spray booth for models
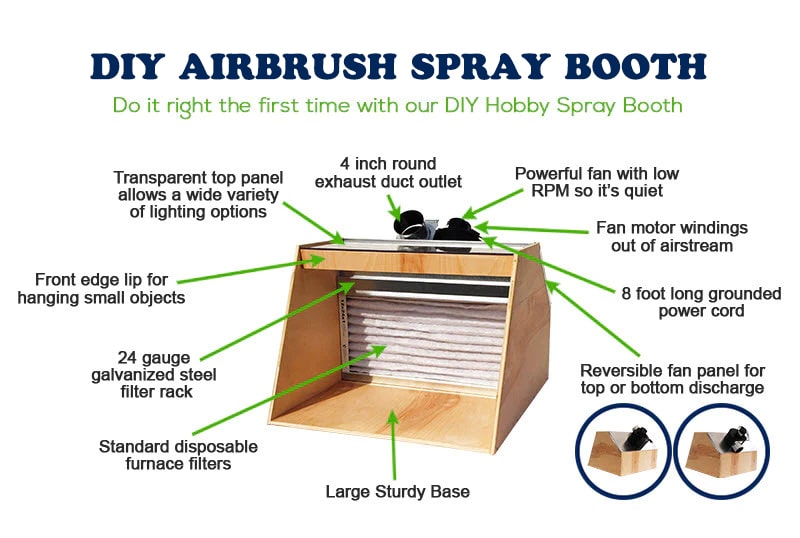
DIY airbrush spray booth / DIY hobby Spray Booth
If you are a professional modeler, if you want to make a high-performance paint booth, this article titled “Homemade spray booth for models” is for you. All you need is some basic tools, common materials, and a few hours to build.
We recently created our own hobby spray booth, which was very good for us, so we prepared this article to show how we do it. Choose your preferred wood type, follow the instructions and start building your spray booth.
Below, we highlight some of the benefits of our hobby spray booth.
DIY Spray Booth Specifications / DIY airbrush spray booth plans
- 265 CFM exhaust blower, 115 volts, 1.9 amp, 1500 RPM.
- 7-foot-long grounded power cord.
- 24 gauge galvanized steel mounting panel for the blower.
- 24 gauge galvanized steel filter rack, for use with a standard furnace replacement filter. 12″ x 24″ x 1“
- 4-inch round exhaust duct outlet for easy venting (standard dryer vent)
- 1/2 inch thick plywood for the bottom, sides, back, and front panels.
- 1/4 inch thick plexiglass for the top panel.


DIY airbrush spray booth fan
We chose this Dayton blower because it was quiet and powerful. We’ve done comparison tests of several different blowers and fans, the Dayton 6FHX9 was the quietest, the best performance against static pressure, and the best overall performance from other similar blowers (265 CFM). We also received positive feedback from many readers about their blowers.
We know that Amazon’s retail pricing can be a bit expensive, so if you don’t mind the cost, we recommend you buy this model. If you have chosen to use a different blower and your exhaust pipe is longer than 8 meters in operation, be sure to withstand static pressure similar to the Dayton blower.
Make sure that the key features are as specified in the following table.
This type of blower does not come wired, so you will have to get a grounded power cord and wiring it yourself. This process is extremely simple, literally only 3 wires; 1 positive, 1 negative and 1 ground. Don’t worry, you won’t need any prior knowledge or electrical knowledge to wire the blower.
We used 24 gauge galvanized steel for the fan mounting panel, so that we could only discharge the top or bottom by turning the panel. We installed the blower outside so that the motor windings would not be damaged by harmful paints and solvents.
When we installed the spray booth, we created our own square-round adapter. People started asking us where to buy an adapter, so we started looking for an adapter that would work. After much research, we concluded that there was no commercially available adapter to switch from the blower’s square flange to a round duct outlet. We’ve found that we can add value if we make this adapter commercially available.
Current Information:
We adapted this product we found to our project. We removed the triangular sections in the header of the adapter we bought according to the fan dimensions we will use. The piece we obtained has become suitable for our project. You can buy the square-round adapter here.

This product allows the Dayton Blower 6FHX9 to be ventilated using a standard 4 “inch diameter circular duct. This adapter can be used with rigid, semi-rigid or flexible ducts.
Note: You must bend the flange flush with the blower body for proper alignment of the adapter’s bolt arrangement.
Warning: Flange sizes and bolt patterns may vary and may not match other blowers.
When we created the filter rack for our spray booth, we used 24 carats of galvanized steel, and we realize that most people will not be able to use it. The filter rack can be made of wood, it can be plywood that you use to create the cabinet. If you want to use a different filter, you can browse the options here.
Note:
For example, if you use an expensive allergen filter, cheap standard furnace filters work best. Strain the furnace filter, restrict flow and cause insufficient ventilation.
DIY airbrush spray booth for models Lighting
We decided not to include the internal lights in the booth, but instead, we used Plexiglass as the top panel. In this way, the light could easily enter the cabin and we could quickly adjust the light depending on where we are and what we do. We recommend 1/8 “to 1/4” Plexiglass, but you can use any translucent material. Local hardware stores should have something available in stock, but thickness, size, and materials may vary.
We used a table saw to cut the material, but a circular saw will work. Be sure to adjust the depth of the saw blade only to clean the material, otherwise, the material may detach, crack, or saw chip.
The spray booth used in this article is built using a Vent Works Filter Rack and Fan Mounting Panel, but you can also make these parts yourself using wood. If you are using wood for the fan mounting panel, the final process shown in the Mounting the Dayton Blower 6FHX9 to the Fan Mounting Panel video will be the same. You will have to create a panel, cut the hole, drill pilot holes in the panel and fan, and provide proper hardware and air tightness.
Below are images of a cabinet created using the same plywood, filter frame, fan mounting panel, and top panel (instead of Plexiglas) for the cabinet.
We have come to the end of our article titled Homemade spray booth for models. We welcome your comments and questions about the content. You can stay on track by visiting our Social Media accounts.
An Important Update and Warning !!! Organic Solvents Half Face Mask and Safety Glasses
Whether in this kind of DIY project or model painting stage, we will definitely recommend using it for your health and safety. The integral double Organic Solvents Half Face Mask and Safety Glasses. Without these two accessories, never go over your counter. Volatile water-based, enamel paints or dust-containing environments contain substances that can seriously harm your health. We strongly recommend using these products to take precautions.
DIY airbrush spray booth disclaimer:
The plans and projects shared in the article and the resulting spray booth should be used in private spaces with professionally ventilated systems or outdoors. The flammable and combustible properties of the volatile chemicals used should not be forgotten, and the presence of fire or fiery tools in the environment should be avoided.
At Hobbyzero.com, we warn in advance of situations such as accidents, fire, explosions, and poisoning that may occur as a result of the information we share in the article, and we state that necessary precautions should be taken and we clearly state that we do not take responsibility in such cases.
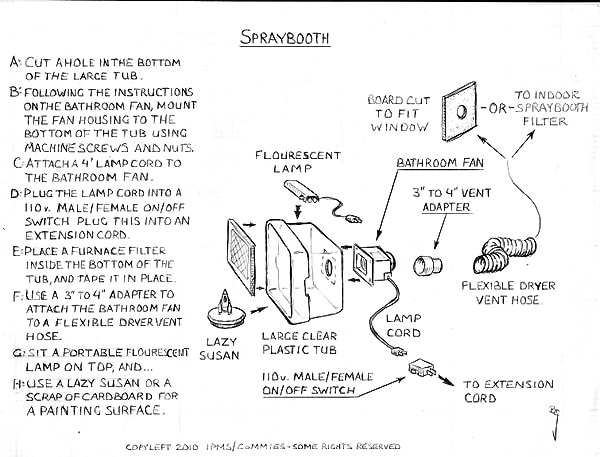
We recommend that you take a look at the alternative “Homemade Spraybooth and Filter” construction chart available here.
Do you need a spray booth for airbrushing?
How do you make an airbrush paint booth?
How do you make a hobby spray booth?
How do I make a cheap spray booth?
You can make your own spray paint booth very using cardboard and tape. Watch the video we shared in the 2nd or 3rd title.
What is an Airbrush Spray Booth?
An airbrush spray booth is a device that helps to control the overspray when using an airbrush. It does this by providing a contained area for the airbrush user to spray their paint in and then vents the fumes out of the room. This containment of the paint and fumes prevents the paint from getting on surfaces that should not be painted and also helps to protect the user from inhaling dangerous fumes.
Do you have to have an Airbrush booth?
An airbrush booth is not a requirement for painting your model, but it does have some advantages. The most important advantage is that it significantly reduces the amount of overspray. When you are spraying paint, some of the paint will inevitably end up outside of the booth on your floor, walls, or furniture. An airbrush booth contains the paint inside, so you don’t have to worry about making a mess.
Do you need a spray booth for airbrushing?
A mini spray booth is a great investment for any airbrusher, regardless of skill level. Not only does it provide a safe and efficient environment to work in, but it can also help protect the user’s lungs from harmful paint fumes. Whether you’re thinking of taking up airbrushing as a hobby or as a professional endeavor, investing in a mini spray booth is an important step to consider before getting started.
There are many options available when choosing the right type of DIY airbrush spray booth. One popular choice is purchasing a ready-made one from your local market or online retailer. Additionally, there are many DIY tutorials available on Reddit that provide detailed instructions on how to build your own mini spray booth for under $100 dollars!
How to build your own mini spray booth for under $100 dollars!
Creating your own custom airbrush spray booth doesn’t have to break the bank. With the right materials and some elbow grease, you can build a mini spray booth for under $100 dollars! DIYers of all skill levels can benefit from saving money by making their own paint booths. Not only will it save them money, but they’ll also be able to customize their new spray booth to suit their specific needs.
With these easy steps, you’ll be able to create an efficient and cost-effective airbrush spray booth without spending too much time or money. From sourcing materials such as a fan and filter to assembling the frame and ventilation system – this article will give you everything you need to know in order to build your own small paint booth!
DIY Spray Booth Materials
Creating a DIY spray booth is the perfect way to take your airbrushing projects to the next level. Whether you’re painting models, cars, or furniture, having a separate space for painting will help keep your home or workspace clean and organized.
To build a simple spray booth from scratch, you’ll need some basic materials such as cardboard boxes, a fan or blower, a flexible ducting hose, and insulation materials. It’s also important to consider the type of paint you plan to use in order to choose an appropriate ventilation system that can safely filter out fumes and vapors. For outdoor spray booths specifically, it’s best to opt for plastic sheeting that won’t be affected by weather conditions like rain or snow.
Step 1: Build Frame
The first step in creating a DIY airbrush spray booth is building the frame. You’ll need some 2×4 wooden posts for this job – enough for four sides of the frame, as well as one board for the top and bottom of each side. Measure out each piece according to how big you want your spray booth to be – it should be wide enough for comfortably working on large pieces of Gunpla kits, but not so high that it takes up too much space in your workshop or garage.
Cut the wooden posts to size and screw them together for a sturdy frame. The next step is to line your DIY airbrush spray booth with plastic sheeting. This should be a heavy-duty plastic that’s resistant to dyes, water, and solvents.
You’ll also need to drill holes in the frame for the plastic. Make sure these are large enough for you to fit your airbrush through, and try to place them at waist height so you don’t have to reach up or crouch down too much when working.
Step 2: Prepare Filter Screen
In order to create a DIY airbrush spray booth, the second step is to prepare filter screens. A filter screen is an inexpensive and easily sourced material that helps contain paint particles when using an airbrush. To begin, measure the area where you want to place your filter screen and cut it with scissors or a utility knife to fit the space. The size of the filter screen will depend on how much ventilation space you need for your project.
When setting up your DIY small paint booth outdoors, consider adding a plywood frame around the edges of your filter screen for added strength and durability in windy conditions. You can also add weights such as bricks or stones along the bottom edge of your frame to help keep it stable in strong winds while painting outside. Make sure not to attach anything directly onto the frame as this may interfere with proper airflow within your paint booth.
When painting outside, you should avoid areas of high wind, as this can cause your small paint booth to sway in the wind and potentially damage your paint booth.
Step 3: Install Lights
Installing lights in a DIY airbrush spray booth is an important step in ensuring visibility and safety during your project.
Whether you are building the booth from scratch or purchasing a prefabricated version, installing lights is a simple process that can be completed with a few tools. Here’s what you need to know about Step 3 of your airbrush spray booth setup:
When it comes to lighting, there are many options available for DIYers looking to build their own airbrush spray booth. LED strip lighting and fluorescent tubes are both popular choices for providing bright illumination inside the enclosed space. Fluorescent tubes require ballast that must be installed in order to power them and LED strip lighting offers a higher output level with fewer components needed for installation.
LED strip lighting has a much longer life span than fluorescent tubes and they are more durable as well. LED lighting can be used in areas that are wet or damp, like basements. Fluorescent tubes cannot be used in wet conditions and must be kept dry at all times.
Step 4: Connect Extractor Fan
Installing a ventilation system for your DIY airbrush spray booth is an important step to ensure that you are creating a safe environment when working with paints. Step 4 of this process is connecting the extractor fan, which will pull all fumes away from the work area. This article explains how to correctly and safely install an extractor fan in your DIY airbrush spray booth so that you can safely paint Gunpla models or other projects without worry.
First, locate a suitable spot for the fan such as near a window or outside wall, and make sure it is close enough to the spray booth to be connected via ducting. Securely fix the unit in place, ensuring there are no gaps for fumes to escape through. Connect one end of flexible ducting onto the rear of the fan and seal off any joints with foil tape or similar material.
The other end of the ducting can then be connected to the spray booth.
Next, locate a suitable spot for the air filter unit, such as near a window or outside wall, and make sure it is close enough to the spray booth to be connected via ducting.
Step 5: Test Setup
When setting up a DIY airbrush spray booth, there are several steps that need to be taken. Step 5: Test Setup is the most important of them all. This step allows you to ensure that your spray booth is properly ventilated and running correctly so that it can be used safely.
Testing your DIY spray booth is simple and should be done before use in order to avoid any potential hazards. You will need to check the ventilation system, making sure it is drawing in clean air from outside and expelling fumes while also checking for any leaks or blockages. It’s also important to make sure the portable airbrush spray booth is securely fastened down and free of debris so that you can work safely inside it.
Conclusion: Airbrush With Care
Airbrushing can be a great way to add a personal touch to any project. But as with any tool, it is important that you take the necessary precautions when using it. Before attempting a DIY airbrush spray booth outside or following advice from Hobbyzero, make sure to research safety measures and follow directions closely.
When building an outdoor paint booth, ventilation is essential in order to provide adequate airflow and avoid the accumulation of fumes and vapors. You should also consider the placement of the booth so that overspray doesn’t damage your property or neighbors’ belongings. Additionally, wear protective gear such as gloves, masks, and goggles when working with airbrush paints and solvents – even outdoors – to avoid contact with skin or inhalation of toxic substances. Finally, properly store all products away from heat sources or children’s reach after each use.

This looks pretty cool. I am used to using old fans from used computer towers, cardboard boxes and 4 inch dryer duct. Something a little more permanent would be cool instead of having to salvage these parts like usual. I may give this a try. Very well done !
Our experience increases one more time with your comments. We are motivated to prepare new informative articles. We will be much happier if you share your experiences with us.
Where do I go to get the square round hose adapter you talk about in your homemade booth blog?
Hi Shawn;
We adapted this product we found to our project. We removed the triangular sections in the header of the adapter we bought according to the fan dimensions we will use. The piece we obtained has become suitable for our project. You can buy the square-round adapter here. https://amzn.to/2W22MYD
We also updated the title related to your question.